SUPER STUDIO SESSION™
TABLE OF CONTENTS
There are some new and exciting features in this version of Super Studio Session. Here is a brief excerpt of those features:
1. Compatibility
Super Studio Session now works with most versions of the Macintosh System Software. In addition, Super Studio Session works with most Macintosh computers from the Macintosh Plus to the PowerBooks, Quadras, Centrises, and AV machines. However, Super Studio Session may not be compatible with all versions of PowerMacs.
2. Printing
Due to popular demand, we have added printing. This new feature is described on page 17.
3. Individual Track Volume Control
For Macintosh II’s and above, we have added individual track volume control for all eight tracks of your song from ppp (very soft) to fff (very loud). This new feature is described on page 28.
4. New Features
We have added other miscellaneous new features, such as a new hierarchical Edit menu command, new keyboard equivalents for transposing octaves, and support for the new version of SSMU™ (Studio Session MIDI Utility).
5. New Versions
We have included within this package two different versions of Super Studio Session. Super Studio Session 11KHz plays instruments at 11KHz and Super Studio Session 22KHz plays instruments at 22KHz. In addition, we have redigitized all the instruments at 22KHz. If you have a Macintosh Plus, Macintosh SE, PowerBook 100, Macintosh Portable, or a Macintosh Classic (but not II) use Super Studio Session 11KHz. If you have any other machine, use Super Studio Session 22KHz.
Please do not hesitate to email us with your comments.
Super Studio Session includes the following:
1. Contents of the Program
The program contains the Super Studio Session application programs, a collection of sample songs, a comprehensive phrase library excerpted from those songs that you may use in your own compositions, nearly 100 distinct musical instruments and sounds such as electric and acoustic guitars, woodwinds, strings, synthesizers, percussion instruments, and human voices, and the animation included with Super Studio Session. Super Studio Session gives you complete composition and performance capability for your songs. The Super Studio Session Editor allows you not only to write your own music but also to play it on your Macintosh or your home audio system. You can create and arrange pieces that range from solo to symphonic compositions by using the Editor’s eight tracks. You can also weave in any number of instrumental voices.
All of the digitized musical sounds provided with Super Studio Session were created by recording the actual sound of more than 50 different musical instruments in a professional recording studio. You can separately purchase sound digitizing hardware and/or software so that you can create your own instrument files. Products such as SoundEdit™ by Macromedia offer easy to use methods of digitizing sound from your own record player or CD player.
2. Installing on Your Hard Disk
To install Super Studio Session, follow these steps if you have diskettes:
1. Insert the Super Studio Session diskette. Double click on the icon named “Super Studio Session #1.” The program will ask you to “Select Destination Folder.” Select the “Drive” or “Desktop” button until you see a hard disk in the left part of the window. Open it and select “Extract.” This will create a new folder entitled “Super Studio Session” on that hard disk.
2. Insert the Instruments diskette. Double click on the icon named “Super Studio Session #2.” The program will ask you to “Select Destination Folder.” Select the “Drive” or “Desktop” button until you see the hard disk you selected above in the left part of the window. Open the hard disk and locate the “Super Studio Session” folder. Open it and locate the “Instruments” folder. Open it and select “Extract.”
3. If you have a Macintosh Plus, Macintosh SE, PowerBook 100, Macintosh Portable, or a Macintosh Classic (but not II) use Super Studio Session 11KHz. If you have any other machine, use Super Studio Session 22KHz. This latter version of Super Studio Session plays the digitized samples of instruments at 22KHz.
If you have sound problems, please read the following:
Super Studio Session 2.2.1 now supports Sound Manager 3.0, the sound control panel and extension from Apple Computer. You may experience sound problems due to incompatibilities between different versions of the Macintosh system software and different versions of the Sound Manager. Super Studio Session tries to configure itself correctly taking into account your system software and Sound Manager.
However, if your sound warbles or if you have
no sound, try the following: (1) In the Apple menu (![]() a), choose the “Configure...” menu command. (2)
The last check box is a new option: “Sound Manager 3.0.” Switch this
setting. (3) Quit (
a), choose the “Configure...” menu command. (2)
The last check box is a new option: “Sound Manager 3.0.” Switch this
setting. (3) Quit (![]() Q) and reopen
the Super Studio Session program. This should alleviate any sound problems. Alternatively,
you may want to obtain Sound Manager 3.0 from Apple and try installing that.
Q) and reopen
the Super Studio Session program. This should alleviate any sound problems. Alternatively,
you may want to obtain Sound Manager 3.0 from Apple and try installing that.
4. Manual
We hope you like the look of our new manual. We have organized it to give you first a brief introduction to Super Studio Session. This manual then gives you an overview of the features of the Super Studio Session Editor followed by a description of all of the different menu commands available in Super Studio Session. And, lastly, there are appendices which describe instruments and their characteristics, multiple note voices, using phrases to build a song, and the other instrument disks available for downloading.
To write a new song follow these steps:
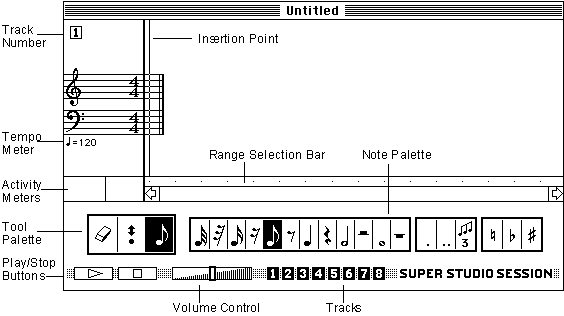
1. Double click on the appropriate Super Studio Session disk icon. Super Studio Session will draw the Editor window on the screen. The Editor window should look like the window shown below. After it is displayed on the screen, look it over. The Editor window is your “blank slate” which this chapter will teach you to use.
2. New files are always called “Untitled.” The name “Untitled” will appear centered in the title bar of the window. This window is called the “Staff Window” as you can see in the diagram shown below.
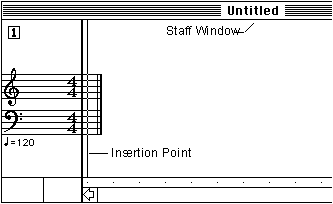
3. In the Staff Window, the cursor, which is normally an arrow, will change into the currently selected music tool, normally a note. As you click, you will get an “insertion point” and it slowly blinks on and off. This marks your place in the song where you will now do your songwriting. At the beginning, it is located directly to the right of the Treble Clef because there are no notes in your song yet. This insertion point works exactly the same way as it does in any word processing program, the insertion point indicates where the next input, in this case notes, will be placed. See the diagram above.
4. To enter elements of songs, such as notes and rests into the Staff Window, select a tool from the Tool Palette. The Tool Palette is located in the lower left portion of the screen. As shown below, the first symbol is the Eraser Tool, the next symbol is the Bender Tool, and the next symbol is the Note Tool. First, click on the Note Tool. You may then select from any of the notes that appear in the Note Palette to the right of the Tool Palette.

5. Next, move the cursor to the Staff Window. Notice that the cursor changes shape from an arrow to the Music Note. If you click anywhere on the Treble Clef or the Bass Clef, a note is placed where you have just clicked. You have just entered in a NEW song!
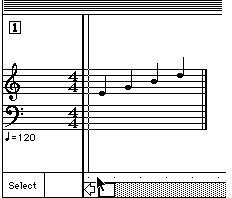
6. To play your new song, you must first specify an instrument. Move the cursor below the Staff Window to the long rectangle with dots. This is called the Range Selection Bar. Notice that the cursor has changed from the Note Tool to an arrow. Put the cursor, now an arrow, at a point to the left of the beginning of your song and click. A large insertion point should now appear at the beginning of your new song. See the diagram above.
7. To add the instruments to play your new song, choose the “Add Instruments” command from the “Windows” menu as shown below.

8. The Instruments folder should appear in the left side of the window. Open it. When the instrument file names appear, select “Add All” and all the Instruments will be loaded into memory. If the dialog box reappears, select either “Cancel” or “Eject.” You will then have all of these instruments available for use in your songs.
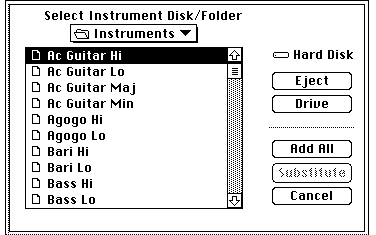
9. If you have other Instrument disks from which you would like to use instruments, such as the Brass Disk or the String Quartet Disk, follow this procedure. Insert any other Instrument disk that you have such as the Brass Disk. When the instrument names are displayed in the Directory Window, click “Add All” and they will be loaded into memory. If the dialog box reappears, select either “Eject” or “Cancel.” You will then also have all of these instruments available for use in your songs.
10. The Staff Window should now appear with the insertion point at the beginning of your song. By placing the instrument name at this point, you may choose which instrument will play your song.
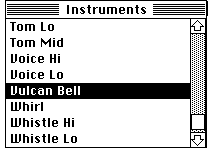
11. To choose an instrument name, move the cursor to the Instrument Library Window and click once to make it the active window. You may use the scroll bar on the right side of the window to view the many different instruments available by either clicking in the arrows or dragging the white box to any desired location on the scroll bar. To select an instrument, such as “Vulcan Bell,” simply click on it. Move the cursor to the “Insertion” menu and choose the “Insert <instrument name>” menu command. Or, as a shortcut, you can hold down the shift key and click on the instrument name to add it to your song. See the diagram below.
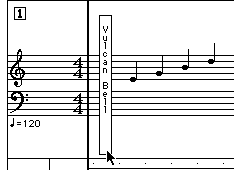
12. As shown below, the instrument name you chose will appear to the left of the insertion point and you now have everything you need to play your song.
13. To play your song, simply select the “Play” button, which is located in the lower left corner of the screen. If you wish to stop playing your song at any time, simply click on the “Stop” button.
![]()
14. To adjust the volume on your song, you may move the volume indicator knob to the right (louder) or to the left (softer).
![]()
To play an existing song, follow these steps:
1. Under the "File" menu, choose the menu command "Open". This allows you to either play any of the songs that are provided with Super Studio Session or to play any of the songs that you have written.
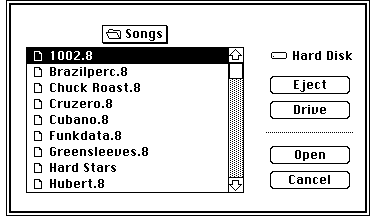
2. A dialog box will appear as shown below. You may scroll through this dialog box, again by using the scroll bar on the right side of the window. You may select any of these songs by either: (1) clicking on the song title and selecting "Open" or (2) double clicking on the song title. The song will appear in the Staff Window.
3. If a dialog box appears when you try to play the song asking for the location of any of the instruments, follow this procedure:
Locate the folder which contains the instrument(s) using the standard dialog box as shown in step no. 8 above. When the instrument file name(s) appear in the Directory Window, select “Add All” and the directory of the Instruments disk will be loaded into memory. If the dialog box reappears, select either “Cancel” or “Eject.” You will then have all of these instruments available for use in your songs.
4. To play your song, simply click on the “Play” button, which is located in the lower left corner of the screen. If you wish to stop playing your song at any time, simply click on the “Stop” button.
![]()
This chapter will give a more complete description of some of the features of the Super Studio Session Editor. The menus available in Super Studio Session are more fully covered in the following chapters.
1. Track Number
This shows you on which track you are currently working. You may quickly jump through tracks by: (1) holding down the _ key and typing the number of the track, such as 3, that you wish to see or (2) clicking on the track number in the Editor Window.
These buttons show which tracks of your song will be played. In default, they are turned on (black). If you wish to play only a certain track of your song, turn the other tracks off by clicking the buttons - they will turn white. Click the play button and you will hear only the selected track. To turn them back on, simply click on them again.
3. Tempo Meter
This shows you which tempo your song is in. To change the tempo quickly, double click on the tempo meter that appears just below the Bass Clef. A dialog box will appear asking you to choose your new tempo.
These meters show you which action you are about to take (such as erasing a note) and the pitch of the note you are about to place in your song (such as B0).
This bar allows you to select certain portions of your song for commands. To select a portion of your song, click in the Range Selection Bar beneath the starting point of the portion you wish to select. Holding down the mouse button, click/drag to the right or the left. Release the mouse when you come to the end of the portion you wish to select. To de-select this portion of your song, simply click once outside of the selected area. To select an entire measure, double click anywhere in the measure.
6. Eraser Tool
The Eraser Tool removes any unwanted notes. Place the Eraser Tool over or below any note and click once to delete it. To erase a series of notes, use the Range Selection Bar to highlight a series of notes and then press the delete key.
7. Note Tool
The simplest way to use the Note Tool is to click and enter a note. Other functions (remember that the Activity Meter will reflect your chosen function) of the Note Tool are:
• Insert a Note: When entering a note, you may change the pitch and/or the duration of the note by using the mouse. To raise or lower the pitch of a note by 1/2 step, continuously hold down the mouse button and move the mouse up to increase the pitch or down to decrease the pitch. Similarly, to change the duration of the note, continuously hold down the mouse button and move the mouse to the right to increase the duration or to the left to decrease the duration.
• Insert a Series of Notes: To enter in a series of notes of the same pitch, enter in the first note. Then, hold down the shift key and select as many notes from the Note Palette as you like. These notes will automatically appear in the Editor Window at the same pitch as the first note.
• Replace a Note: To replace a note, click anywhere above or below the note. A new note will appear on the Staff Window where you just clicked.
• Insert a Rest: The current tool, whether a note or a rest, can be switched to the other tool by holding down the shift key.
8. Bender Tool
The Bender Tool allows you to modify the pitch or duration of a note. If you place the Bender Tool above or below a note, a click of the mouse will move the note to the new pitch or location on the Staff Window where you have just clicked. If you hold down the mouse button, the Bender Tool functions as described in No. 1 of the Note Tool.
Note: When entering notes,
you may change to the Bender Tool by holding down the command key (![]() ).
).
The Apple menu is the first menu in the menu bar. It contains information about Super Studio Session and desk accessories, such as the Calculator and the Chooser, that you may need while in the Super Studio Session application.

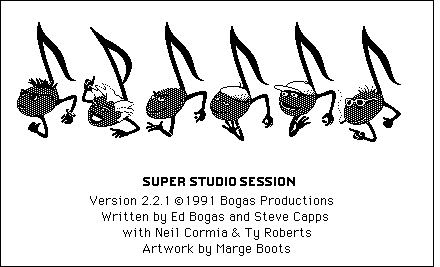
This command gives you information concerning Super Studio Session. After you have opened up a song and loaded all the instruments, if you choose the "About Studio Session" menu item, the "Notes" as shown below will animate and dance along with your tune.
2. Configure
This command displays a dialog box as shown below.
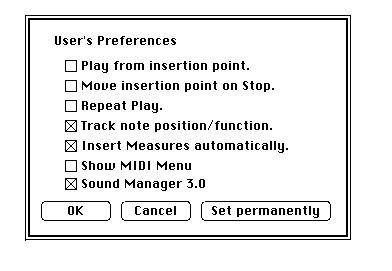
This command configures certain Editor operations and features to suit your own particular preferences. The dialog box shown above displays the default configurations which may be changed as described below. To select any item, simply click in the box and an "X" will appear to indicate that you have selected this option. To de-select any item, simply click in the box again and the "X" will disappear. The options are as follows:
• Play from Insertion Point
When this option is selected, the song will play only from the insertion point until the end. If the insertion point is moved, you must click in the Range Selection Bar to play the song.
• Move Insertion Point on Stop
When this option is selected and the "Stop" button is selected, the insertion point will move automatically to the note right after the final note that was played. This option allows for correcting music by selecting the "Stop" button right after a mistake is detected. The insertion point then will be located right after the mistake.
• Repeat Play
When this option is selected, the selected range of music will repeat until the "Stop" button is selected.
• Track Note Position/Function
On default, this option is selected. When this option is selected, the Activity Meters will monitor both the function you are using and the key of the note on which you are working. If this option is not selected, the Activity Meters will not monitor any work you are doing and will remain blank.
• Insert Measure Automatically
On default, this option is selected. This option automatically inserts measure lines into songs based upon the current Time Signature.
Hint: Super Studio Session automatically assigns the first music symbol it finds to the first beat of a measure. Therefore, if for example, you are writing in 4/4 time and you want to start on the fourth beat, make sure you add three quarter rests before the first note. Super Studio Session will then put the first measure bar after the note.
• Show MIDI Menu
This option displays the MIDI Menu which allows you to insert special MIDI commands into your song. These commands are only useful if you use Studio Session MIDI Utility (SSMU). SSMU is an application which will convert your Super Studio Session songs to MIDI format and acts as a MIDI sequencer for use with your MIDI equipment. If you do not own SSMU, do not enable this option. SSMU is no longer available from Bogas Productions.
• Sound Manager 3.0
On default, this option is selected. If your sound warbles or if you have no sound, try switching this setting, quitting Super Studio Session, and relaunching it.
Buttons: Across the bottom of the Configure dialog box you will see the buttons "OK", "Cancel", and "Set Permanently." Selecting "OK" will cause Super Studio Session to implement the currently selected choices. Selecting "Cancel" will not cause any changes to be made. Selecting "Set Permanently" will cause your choices to become the default parameters. The next time you start Super Studio Session these choices will be used.
As in most Macintosh application programs, the "File" menu is the second menu item in the menu bar. It contains certain commands, some of which are described below.
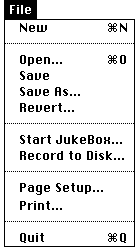
1. New ![]() N
N
This command creates a new file called "Untitled."
2. Open ![]() O
O
This command opens an existing file. When this command is chosen, the following dialog box appears. You may open a file by double clicking on the file name OR by clicking on the file name and selecting "Open."
3. Save
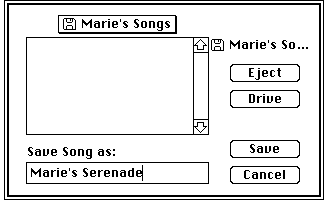
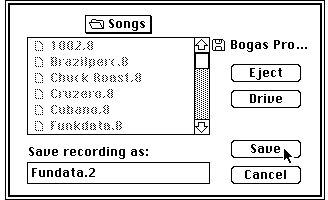
This command saves a file onto either a disk or a hard drive. If you save a new song, the following dialog box will appear. Name the song before saving it. If you save a song that is not new, the song will be updated with your changes but the dialog box will not appear. If you do not have room on your hard drive to save a song, you may save it onto a disk. Select "Drive" or "Desktop" in the dialog box until the name of your disk, for example "Marie’s Songs," appears in the upper right corner of the dialog box, as shown below. You may then save your song onto that disk.
4. Save As
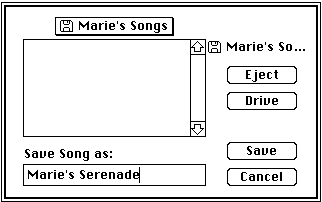
This command saves files that already have a name to a different file. By using the “Save As” command, you may save two different versions of the same song instead of updating the same song. The dialog box shown above will appear. Simply name the song before saving it.
5. Revert
This command reverts to the last saved version of the song on which you are currently working. Revert quickly "undoes" errors you may have made in a song. However, this command only works if you have previously saved the song in a file. Otherwise, try the "Undo" menu command under the "Edit" menu.
This command allows you to select a number of songs, determine the order of their performance, and play all of those songs. After you select "Start JukeBox," the dialog box shown below appears. If there are no songs in the dialog box, you will need to find your songs. If they are on a disk, select "Drive" or "Desktop" until you see your songs listed. If they are in another folder, find that folder by clicking in the folder menu at the top of the dialog box. Select a song by clicking on the song’s name and selecting "Add Song." After you have selected your songs, select "Play 'em." Super Studio Session will now play all of your selected songs. If you wish to play ALL of the songs on a disk or in a folder, simply select "Add All" and Super Studio Session will play ALL of the songs.
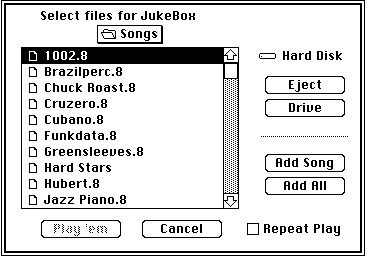
If you wish to repeat the songs you just played, select “Repeat Play” and the songs will be played over again.
Note: If some of the instruments in a song you selected are not on the disk or in the folder you designated, a dialog box will appear asking you for the location of the instrument(s). You must locate the instruments, either on a disk or in the proper folder. Once you have located the instruments and they appear in the dialog box, click on the instrument(s) and then select “Add.” If the dialog box reappears, select either “Eject”or “Cancel.” All the instrument files are now loaded and the songs will begin to play.
To Stop Playing: If you want
to stop playing any specific song, just click the mouse button. That particular song will
stop playing and the next song will commence playing. If you want to stop the entire
sequence of songs, hold down the command key (![]() ) and the
period key (.) at the same time. The entire sequence will stop and the Editor Window will
reappear.
) and the
period key (.) at the same time. The entire sequence will stop and the Editor Window will
reappear.
This command allows you to save songs in SoundEditŞ format. These songs may then be used with programs such as HyperCard¨. After you choose "Record to Disk," the following dialog box will appear. Type in the name you wish to call this "recording." You may wish to give it a different name than your song file to avoid file compatibility problems. A dialog box will display the amount of time your recording will have as it is being saved to a hard drive or a disk. A sound sample takes 11,000 bytes per every second of song.
8. Print
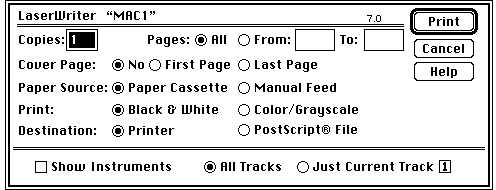
By popular demand, Super Studio Session now prints and now has "beaming." "Beaming" allows groups of notes to be printed with beams instead of individual tails. To print your song, under the "File" menu item, choose the "Print" menu command. The Print dialog box shown below will appear. As you can see, you can print either all tracks or a particular track of any song. In addition, you may print your song so that the instruments you selected also are printed by selecting "Show Instruments."
9. Quit ![]() Q
Q
This command allows you to return to the Finder. If you have made changes to a song and not saved them, a dialog box will appear. If you wish to save the changes, select "Yes." If you do not wish to save the changes, select "No." If you do not wish to return to the Finder, select "Cancel" and you will be returned to the Editor Window.
1. Undo ![]() Z
Z
This command allows you to “undo” the last operation that you have performed. After choosing “Undo,” the previous material will appear completely intact. Remember that you can only “undo” the very last action you took - you cannot “undo” an action if you have performed an intermediate action.
2. Cut ![]() X
X
This command “cuts” the selected material from the window in which you are currently working and temporarily places the material in the Clipboard. You may put this “cut” material anywhere by placing the insertion point at the desired location and choosing the command “Paste.” If you accidentally cut material, you may either choose “Undo” or you may “Paste” the material back in its original location.
3. Copy ![]() C
C
This command “copies” the selected material from the window in which you are currently working and temporarily places the material in the Clipboard. You may put this “copied” material anywhere by placing the insertion point at the desired location and choosing “Paste.” Using “Copy” does not alter the original material. Remember, “Cut” removes while “Copy” duplicates. The next time you cut or copy, the previously copied material will be erased from the Clipboard. If you want to reuse material many times, you might want to use the “Save As A Phrase” menu command found in the “Selection” menu which will allow you to permanently save this material.
4. Paste ![]() V
V
As described above, this command places a copy of whatever is currently in the Clipboard at the insertion point. If you inadvertently paste material that you don’t want, you may use the “Undo” command to return to the original material.
5. Clear
This command deletes any selected material. You may also delete material by selecting the material and pressing the “delete” or “backspace” key. If you have accidentally deleted or cleared material, you may retrieve the material by immediately choosing the “Undo” menu item.
6. Edit Track
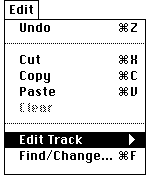
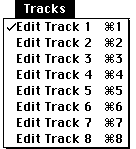
This command easily allows you to edit your musical score in any of the eight tracks. For example, to edit track 1, simply choose “Edit Track 1” and that track will appear in the Staff Window. On older Macintoshes which do not permit hierarchical menus, the Edit menu command will appear as shown below. A separate menu command called “Tracks” will appear to the right of the “Windows” menu as also shown below and may be used to edit any of the eight tracks.
 |
 |
Shortcut: You may instantly access a track by
holding down the Command key and pressing the number of the track you wish to edit. For
example, to edit track one, press (![]() 1). Or, you may click in
the track number that appears underneath the title bar of the Editor Window.
1). Or, you may click in
the track number that appears underneath the title bar of the Editor Window.
This command allows you to find and replace instruments much like the Find/Replace works for words in word processors. To find a particular instrument name, you either type in the instrument name or click on the instrument name in the Instrument Library dialog box which appears to the right of the Find/Change dialog box. See the following diagram. The Instrument name will appear in the “Find What” box. (If you have an instrument selected already and choose “Find/Change,” that instrument will automatically appear in the “Find What” box) To change this instrument name to another name, click in the “Change To” box and type in the new instrument name, or press the Tab key and enter the new instrument name, or click on the instrument name in the Instrument Library dialog box.

There are four things you can do in the “Find/Change” dialog:
• Find Next: This finds and scrolls to the next location in your song of the instrument you listed in the “Find What” box.
• Change, Then Find: This changes the current occurrence in your song of the instrument you listed in the “Find What” box and searches for the next occurrence if you select “Find Next.”
• Change: This will change the currently selected instrument in the Staff Window to the instrument name you listed in the “Change To” box.
• Change All Tracks: This finds all occurrences of the instrument listed in the “Find What” box and changes them to the instrument listed in the “Change To” box in all eight tracks of the song.
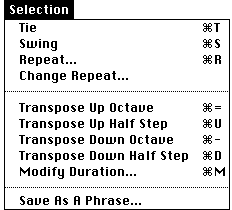
There are two categories of commands under the Selection Menu:
1. Grouping notes together for special effects; and
2. Grouping certain noted elements into "phrases."
These "groups" may then be recorded in the Phrase Library for further use. To activate the "Selection" commands, select a portion of the song. You should then see the menu commands in black. The following are some shortcuts to use in selecting portions of any song:
Selection Shortcut #1: To select an entire measure, double click in the Range Selection Bar anywhere in the measure.
Selection Shortcut #2: To select an entire track from the beginning to the present point, place the insertion point at the present point. Hold down the mouse button and click/drag up.
Selection Shortcut #3: To select an entire track from the present point to the end, place the insertion point at the present point. Hold down the mouse button and click/drag down.
1. Tie ![]() T
T
This command allows you to “tie” notes together to create one sustained tone. A series of notes of the same pitch which are tied together becomes an elongated sustain (tone) or hold (rest). Notes of different pitches may be tied together permitting the melodic line to be played with no breaks between notes. In this case, you will not hear the beginning and end of each note in the sequence. Tieing will only sustain notes that are “looped back.” Notes which are not “looped back” will decay and end, despite being tied together in the song. Check Appendix I to determine which instruments are “looped back” and which are not.
Hint: You can mimic a siren by tieing an ascending and a descending scale of notes.
2. Swing ![]() S
S
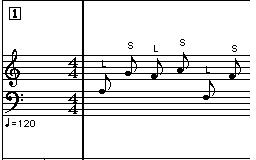
This command is used most frequently in jazz tunes. To use the swing command, select an even number of sixteenth, eighth, quarter, or half notes and then choose "Swing." The first note in each group of two notes will become slightly longer and a small "L" will appear above it. The second note in each group of two notes will become slightly shorter and a small "S" will appear above it. Remember to always select pairs of similar notes. The diagram below shows six eighth notes after choosing the "Swing" command.
3. Repeat ![]() R
R
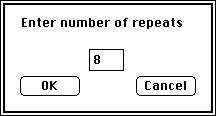
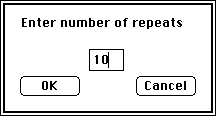
This command allows you to easily repeat pieces of your song. Simply select the portion of the song that you want to repeat. Choose the "Repeat" command. The dialog box shown below will appear. Enter the number of times you wish the phrase to be repeated than either select "OK" or press the return key. A number with an "X" following it will appear above the staff.
This command allows you easily to change the number of times a phrase is repeated. Select the repeat sign in the Staff window (the number with an "X" following it). Choose the "Change Repeat" command. Enter the number of times you wish this phrase to be repeated then either select "OK" or press the return key. The new number with an "X" following it will appear above the Staff. See the diagram below.
This command allows you to transpose a selected range of notes up one octave. This command does not affect any items in the Staff Window besides notes.
This command allows you to transpose a selected range of notes up one half step.
This command allows you to transpose a selected range of notes down one octave.
This command allows you to transpose a selected range of notes down one half step.
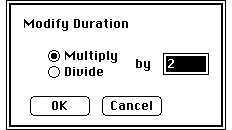
This command allows you to modify the length of the selected note or a series of notes. Select a note or a group of notes and choose the “Modify Duration” command. The dialog box shown below will appear. Select the modification factor and select “OK.”
10. Save As A Phrase
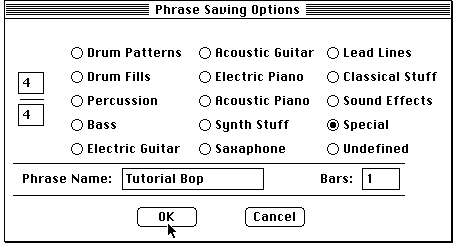
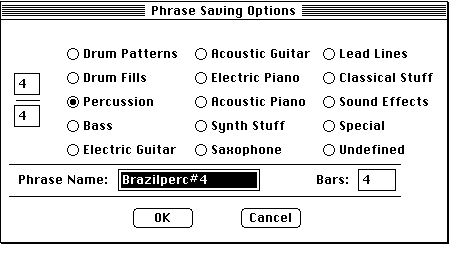
This command allows you easily to save a group of notes as a phrase for use in other songs. Select the range of notes that make up the phrase and choose the “Save as a Phrase” command from the “Selection” menu. The dialog box shown below will be displayed. Assign a name to this phrase, specify its type, and the number of bars in the phrase. Select either “OK” or press return. This new phrase will be displayed in the Phrase Library Window. Phrases are saved with the Super Studio Session default values of a tempo of 120 quarter notes a minute and the key signature of C major.
1. Insert Bar ![]() B
B
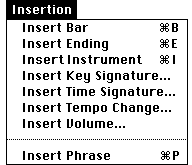
This command will not normally be available since automatic insertion of bars, an option in the Configure menu, is the default option. If it is available, this command will divide the selected series of notes into a measure. Click where you wish to begin a new measure and choose the “Insert Bar” command from the “Insertion” menu. A bar will appear as a dark vertical line on the staff.
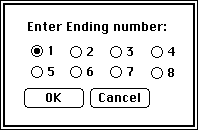
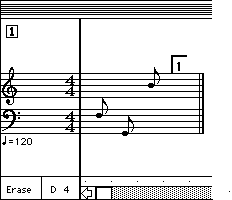
This command will facilitate reuse of a part of a song. To insert an ending, place an insertion point within a repeat in your song and choose the “Insert Ending” command from the “Insertion” menu. A dialog box as shown below will appear. Select the specific ending number and select “OK.” Your song will be changed as shown below. The number of endings must correspond to the number of repeats.
 |
 |
This command allows you to place an instrument name within your song. Place the insertion point where you would like the instrument name and select the instrument you desire from the Instrument Library Window by clicking on the name of the instrument and choosing the “Insert Instrument” command from the “Insertion” menu. The following are three shortcuts you may want to try (click on the Instrument Library Window if needed):
Shortcut #1: Click on the
instrument name you want to add and type the command key and I (![]() I).
I).
Shortcut #2: Shift click on the instrument name you want to add.
Shortcut #3: Even without the Instrument Library Window active, you may scroll to a particular instrument by typing its name or partial name. For example, "cr" will scroll to Crash Cymbal.
This command allows you to change the key of any portion of your song. Click the insertion point where you want to change the key of the song. Choose the “Insert Key Signature” command from the “Insertion” menu. The dialog box shown below will appear. After selecting the new key, the song will play in that key from the insertion point forward.
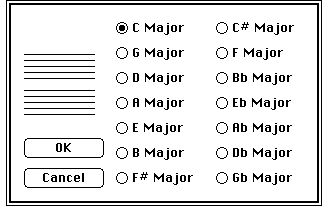
Hint: Remember that the purpose of a Key Signature is to create major or minor scales from a certain set of notes. If, for example, there is a # (sharp) on the F4 line in the signature, all F’s written in that song will sound as F#’s. To alter any or all F#’s, you must use an accidental to create an F natural or an F flat. These accidentals must be restated in every instance where you want a change, even within measures or ties.
This command allows you to change the time signature either for a particular part of the song or for the entire song. Click the insertion point at the point on the track where you want to assign a new time signature. Choose the “Insert Time Signature” command from the “Insertion” menu. The dialog box shown below will appear.
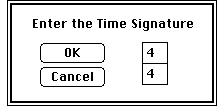
Whole Song: To change the time signature for the whole song, click the insertion point at the very beginning of the song and follow the steps described above.
Shortcut: A shortcut to change the time signature for the entire song is to double click on the signature written on the clefs at the beginning of the staves. The dialog box shown above will then appear.
Limits: The limits for the number in the top field in the dialog box shown above are between 1 and 32, inclusive. The number in the bottom field is limited to 1, 2, 4, 8, 16, or 32.
This command allows you to change the tempo or speed (or the number of quarter notes played per minute) at which your songs are played. Click the insertion point where you want the tempo to change. Choose the “Insert Tempo”command from the “Insertion” menu. The dialog box shown below will appear. The new value determines the tempo. 120 means that 120 quarter notes will be played in one minute, or 2 quarter notes per second.
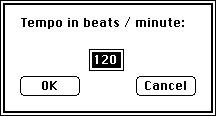
Shortcut: If you want to change the tempo for the entire song, double click on the tempo notation at the beginning of the staves and the dialog box shown above will appear.
Range: The tempo range is 10 to 450 inclusive.
This command allows you to use individual track volume control on Mac IIs or higher from ppp (very soft) to fff (very loud). The dialog box shown below will appear from which you may select the volume control you desire.

If you do not have a Mac II or higher, a dialog box will appear when you first attempt to use individual track volume control. A dialog box will also appear when you first attempt to play or open the song on a Macintosh that is not a Macintosh II or higher. These are shown below.
 |
 |
This command inserts a phrase in a song at the insertion point. Select a phrase from the Phrase Window and then choose the “Insert Phrase” command.
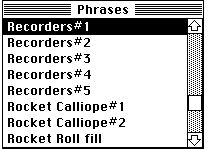
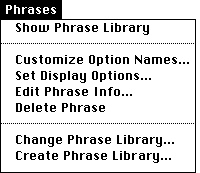
The Phrase Library is a database of musical phrases which can store any selection from the Staff Window. The Phrase Library is in essence a specialized scrapbook for music. Some examples of phrases are: a drum fill, a bass track, and a saxophone solo. The Phrase Library can assist you in composition to see how others organize the layers of their songs. Phrases are organized by instruments, time signature, and length.
This command brings the Phrase Library Window to the front of the other windows. The Editor Window may be re-activated by clicking on it or by choosing the “Show Notes” command from the “Windows” menu.
This command allows you to customize the categories of phrases with which you wish to work. This is especially useful if your own phrases do not fit within the existing categories. When you choose this command, the following dialog box will appear. You may then select one of the existing categories or type in the specific category name you wish to assign to a set of phrases.
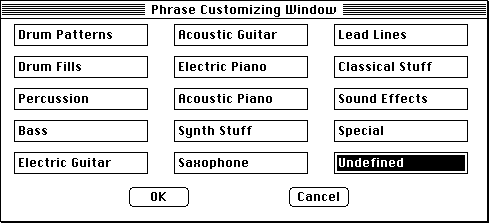
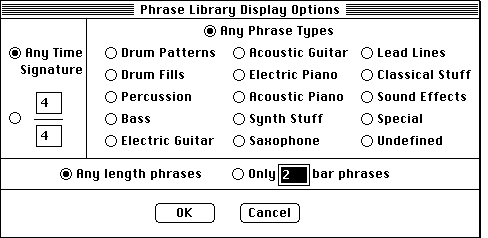
This command allows you to view phrases which fit a certain category. The dialog box shown below allows you to specify the characteristics of that category of phrases.
This command allows you to change a phrase’s name along with other characteristics of that phrase. The following dialog box will appear when you choose the ”Edit Phrase Info” command from the “Phrases” menu.
This command allows you to delete a single phrase from the Phrase Library. Select the phrase in the Phrase Library Window that you wish to delete. Choose the “Delete Phrase” command from the “Phrases” menu. A dialog box will appear confirming your deletion. To delete, select “OK” or press the return key. To cancel the delete operation, select “Cancel” from the dialog box as shown below.

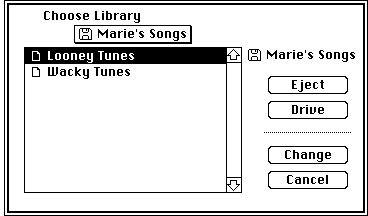
This command allows you to choose a different Phrase Library from which phrases are selected. Super Studio Session comes with its own Phrase Library. If you wish to use another Phrase Library, choose the “Change Phrase Library” command from the “Phrases” menu. The dialog box shown below will appear. Select the new Phrase Library by clicking on the name and selecting “Change.”
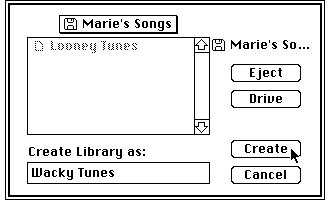
This command allows you to create a Phrase Library in which to store your new phrases. Choose the “Create Phrase Library” command from the “Phrases” menu. The dialog box shown below will appear. Type in the name of your new Phrase Library and select “Create.” The new Phrase Library will appear in the listing and will be available to store your new phrases.

Super Studio Session has three main windows with which it works: the Editor Window, the Instrument Library Window, and the Phrase Library Window. The following is a review of the Windows menu commands.
1. Show Notes
This command brings the Editor Window to the front. You may also simply click on the Editor Window to make it active.
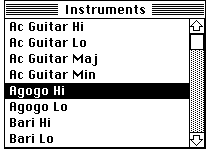
This command brings the Instrument Library Window to the front. This window displays an alphabetical listing of the instruments available. To select an instrument you can either use the scroll bars, or type the first letter of the instrument’s name and the window will scroll automatically to the area containing instruments starting with that letter. See the diagram below. If the Instrument Library Window is empty use the “Add Instruments” menu command as described below.
This command is used to add instruments. When chosen, a dialog box as shown below will appear. Once you have located the proper disk or folder containing the instruments, select “Add All”. If you have additional instrument disks you would like to load, select “Eject” and load them. Otherwise, if the dialog box reappears, select “Cancel” to indicate that you are done. The instrument names will now be available for use in your songs.

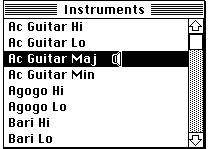
Audition Option: To audition an instrument’s sound, make the Instrument Library Window active. Hold down the option key and move the cursor onto the listing of the instrument names. The cursor will turn into a tiny speaker. Click on the instrument name you would like to audition. You will hear a one second sample of the instrument’s sounds and you should see the diagram below.
Substitute Option: If you play a song and Super Studio Session asks “Where is (instrument name))?” and you cannot locate that instrument, you may substitute another instrument. Select an instrument which sounds like the missing instrument and select “Substitute”. The song will then play with that substitution. When you close the song, Super Studio Session will ask you if you want to save the substitution. If you select “Yes”, the substitution you selected will be permanent. If you select “No”, the song will be saved with no substitutions so that when you find the instrument your song will be able to utilize it, as originally composed.
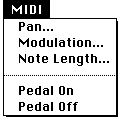
The MIDI menu allows you to insert any of five specific MIDI functions into your song for later use by SSMUŞ. This menu will appear if you have selected “Show MIDI Menu” from the “Configure” command in the “Apple” menu.
1. Pan
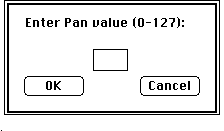
This command is used to place a synthesizer voice at a specific point in the stereo “panorama” and is similar to the L/R balance used on stereo amplifiers. The difference is that you may set pan values for each instrument. When you choose the “Pan” command from the “MIDI” menu, the dialog box shown below will appear. Enter a number between 0 and 127 according to the place you want your instrument to take in the stereo image. 0 is completely to the left and 127 is completely to the right.
 |
 |
2. Modulation
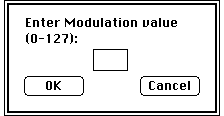
This command is used to add an “undulating” or “vibrato” effect to a synthesizer voice. The degree of effect depends on the value used. 0 is the minimum modulation (no modulation) and 127 is the maximum modulation. The default modulation for all instruments is 0. When you choose the “Modulation” command, the dialog box shown above right will appear. Enter a number between 0 and 127.
3. Note Length
This command allows you to obtain staccato or legato effects on each note in your song or to set an instrument voice to a given value when it starts playing. When you choose the “Note Length” command, the dialog box shown below will appear. Enter a number between 50 and 100. The default value is 90 because a note physically lasts for 90% of its value. The 10% silence at the end of the note is just enough to enable notes to be clearly distinguished from one another.
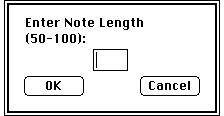
Note: If you use a note length of 100, there is no need to use ties except where consecutive notes are of the same pitch. This is because tied noes of different pitches have a note length of 100% with a new "attack" at the beginning of each note whereas tied notes of the same pitch have a total duration of 100% of the duration of each individual note, but only one "attack" at the beginning note.
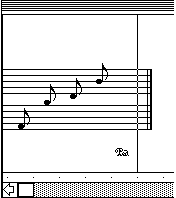
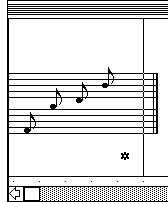
These commands activate and de-activate the sustain pedal effect on the synthesizer. The symbol inserted in your song when Pedal On is chosen is shown below left and the symbol inserted when Pedal Off is chosen is shown below right. The sustain function will remain in effect until it is turned off. After you quit SSMU, the sustain will remain active, so remember to insert a Pedal Off command before the end of every song.
The following chart describes the instruments in Super Studio Session.
Instrument Name: The name of the instrument and sometimes a description of its everyday sound.
Loopback: If “Yes,” the note can be extended indefinitely. If “No,” the note will decay and the tone will eventually diminish and end.
Sounds: If “As written,” both the note and the notation are the same as written for and played on a piano keyboard. Some instruments, such as the basses, sound an octave lower than their notation indicates to make writing and reading them more convenient. These instruments are indicated by “Octave lower.” Other instruments, such as some percussion instruments, are not pitched. These instruments are indicated by “Not pitched.” To get the truest sound from these instruments, write them at C3 (middle C).
Preferred Range: The instruments are most faithful to their name in the preferred range. Outside of the preferred range, they may sound like other instruments. For example, outside of the preferred range, the English Horn sounds like a bowed string bass (which can sound fun).
* Notation: The instruments with an asterisk are special instruments such as a chord. Appendix II gives an explanation of the characteristics of these instruments.
| Instrument Name | Loopback? | Sounds | Preferred Range |
| Ac Guitar Hi (nylon string guitar) | No | As written | G2-C5 |
| Ac Guitar Lo | No | As written | B0-G3 |
| Ac Guitar Maj | No | As written* | E2-C4 |
| Ac Guitar Min | No | As written* | C2-A3 |
| Agogo Hi (Brazilian cowbell) | No | Not pitched | G2-D3 |
| Agogo Lo | No | Not pitched | C2-E3 |
| Bari Hi (Baritone saxophone) | Yes | Octave lower | E3-E4 |
| Bari Lo (Baritone saxophone) | Yes | Octave lower | C1-C4 |
| Bass Hi (String bass pizzicato) | No | Octave lower | G1-G4 |
| Bass Lo (String bass pizzicato) | No | Octave lower | C1-E3 |
| Bassoon | Yes | Octave lower | G1-E3 |
| Bongo Hi | No | Not pitched | G2-E3 |
| Bongo Lo (Conga in its lower range) | No | Not pitched | E2-E3 |
| Boooooing! (Vocal sound effect) | No | Not pitched | C3 |
| Cello | Yes | As written | G0-E2 |
| Claps | No | Not pitched | C2-F3 |
| Clarinet | Yes | As written | C2-C4 |
| Cowbell | No | Not pitched | F2-E3 |
| Crash Cymbal | No | Not pitched | C2-D3 |
| Cuica 1 (Brazilian howling drum, played by rubbing a stick across the drum head) | No | Not pitched | C3 |
| Cuica 2 | No | Not pitched | B2-D3 |
| Cuica 3 | No | Not pitched | B2-F3 |
| Dulcian (An early bassoon) | Yes | Octave lower | F2-C4 |
| E Bass Electric bass) | No | Octave lower | B1-G4 |
| E Piano 13 (Electric piano left-hand jazz chord) | Yes | As written* | D2-G4 |
| E Piano 79 (Electric piano left-hand jazz chord) | Yes | As written* | A1-E4 |
| E Piano Aug (Electric piano left-hand jazz chord) | Yes | As written* | D2-A4 |
| E Piano Dim (Electric piano left-hand jazz chord) | Yes | As written* | C2-F4 |
| E Piano Hi (Electric piano single note) | Yes | As written | C2-F5 |
| E Piano Lo (Electric piano single note) | Yes | As written | C0-C3 |
| E Piano Maj3 (Electric piano left-hand jazz chord) | Yes | As written* | G2-G4 |
| E Piano Maj7 (Electric piano left-hand jazz chord) | Yes | As written* | C2-F4 |
| E Piano Min3 (Electric piano left-hand jazz chord) | Yes | As written* | C2-F4 |
| English Horn | Yes | As written | C2-C3 |
| Flute Hi | Yes | As written | C5-C6 |
| Flute Lo | Yes | As written | A2-A3 |
| Flute Mid | Yes | As written | G3-G5 |
| Guiro 1 (Latin percussion, played by rhythmically scratching stick over the corrugated surface of a gourd like vessel) | No | Not pitched | F2-C4 |
| Guiro 2 | No | Not pitched | F2-F3 |
| Guiro 3 | No | Not pitched | F2-F3 |
| Guitar (electric guitar single note) | Yes | As written | C2-G4 |
| Guitar 4th (Electric guitar two notes) | No | As written* | A1-D4 |
| Guitar 7 (Electric guitar chord) | No | As written* | B2-C4 |
| Guitar Aw (Electric guitar note with pedal effect) | Yes | As written* | E2-E4 |
| Guitar Bent | Yes | As written* | E2-E4 |
| Guitar Bent 4th (Two electric guitar notes bent up) | Yes | As written* | D2-G3 |
| Guitar Bent Fuzz (Electric guitar note bent up) | Yes | As written* | E2-E4 |
| Guitar Fuzz | No | As written* | C0-C4 |
| Guitar Min (Electric guitar chord) | No | As written* | C2-F4 |
| Guitar Wa (Electric guitar note with pedal effect) | No | As written | C0-C4 |
| HiHat Closed (Drum kit foot-operated cymbal) | No | Not pitched | G2-C5 |
| HiHat Open (Drum kit foot-operated cymbal) | No | Not pitched | B2-D3 |
| Jazz Snare | No | Not pitched | A2-G3 |
| Kick (Drum kit foot-operated bass drum) | No | Not pitched | G2-G4 |
| Oboe (Weak as solo, works well in ensembles) | Yes | As written | C3-E4 |
| Orbit (To audition tone, play "Synth Demo") | Yes | As written | C0-C4 |
| Organ Hi | Yes | As written | C3-C6 |
| Organ Lo | Yes | As written | C1-B2 |
| Piano 1 (Grand piano, lowest range) | Yes | As written | C0-F1 |
| Piano 2 (Grand piano, low range) | Yes | As written | B0-A2 |
| Piano 3 (Grand piano, mid range) | Yes | As written | B1-C4 |
| Piano 4 (Grand piano, upper range) | Yes | As written | C3-G5 |
| Piano 5 (Grand piano, high range) | No | As written | C4-C6 |
| Recorder (Baroque woodwind) | Yes | As written | G3-D5 |
| Ride Cymbal (Jazz kit time keeping cymbal) | No | Not pitched | F2-F3 |
| Rock Snare | No | Not pitched | G2-E4 |
| Rooster (Animal sound effect) | No | Not pitched | C3-E4 |
| Shot | No | Not pitched | A1-A3 |
| Splash (A small cymbal) | No | Not pitched | F2-G3 |
| Synth Bass (To audition tone, play "Synth Demo") | No | Octave lower | C2-C5 |
| Synth Shot (To audition tone, play "Synth Demo") | No | Not pitched | C2-C6 |
| Synth Spring | No | Not pitched | C0-C4 |
| Tambourine (A single tap) | No | Not pitched | B2-E3 |
| Tenor Hi | Yes | As written | F2-E4 |
| Tenor Lo | Yes | As written | D1-F2 |
| Timbale Hi (Latin percussion instrument) | No | Not pitched | B2-E3 |
| Timbale Lo | No | Not pitched | F2-E3 |
| Tom Hi (Drum kit tom tom) | No | Not pitched | A1-G3 |
| Tom Lo | No | Not pitched | F2-G4 |
| Tom Mid | No | Not pitched | G1-A3 |
| TympC2 | No | As written | C1-G2 |
| Voice Hi (Vocal sound effect) | No | As written | C2-C4 |
| Voice Lo | No | As written | B0-C3 |
| Vulcan Bell (To audition tone, play “Synth Demo”) | Yes | As written* | G2-F5 |
| Whirl (To audition tone, play “Synth Demo”) | Yes | As written | B0-G5 |
| Whistle Hi | Yes | Not pitched | C3 |
| Whistle Lo | Yes | Not pitched | C3 |
| Whoosh (To audition tone, play “Synth Demo”) | No | Not pitched | F2-G5 |
| Wood Block | No | Not pitched | A2-C4 |
![]() Appendix
II: Multiple Note Voices
Appendix
II: Multiple Note Voices
Some instruments play a chord or a bent note rather than one pure tone. The following table lists these instruments, the sounds they produce if written at C3 (middle C), and a typical musical application.
| Instrument Name | C3 Produces | Typical Use |
| Ac Guitar Maj | C2,E2,G2,C3,E3 | Classical/folk music |
| Ac Guitar Min | C2, G2, C3, Eb3, G3 | Classical/folk music |
| E Piano 13 | Bb2, D3, E3, A3 | Left hand of 13 chord |
| E Piano 79 | E3, Bb3, D4 | Left hand of 9 chord |
| E Piano Aug | Bb2,D3,E3,G#3 | Left hand of augmented chord, 7 and 9 added |
| E Piano Dim | C3,Eb3,F#3,A3 | Jazz/rock chord |
| E Piano Maj 3 | E3,G3,C4 | Jazz/rock chord |
| E Piano Maj 7 | C3,E3,G3,B3 | Jazz/rock chord |
| E Piano Min 3 | Eb3,G3,C4 | Jazz/rock chord |
| Guitar 4th | C3,F3 | 50’s type rock guitar |
| Guitar 7 | C3,G2,Bb2,E3 | Rock chord |
| Guitar Bent | Bb2 bent up to C3 | Rock solo effect |
| Guitar Bent 4th | B2,E3, barred up to C3, F3 | Rock solo effect |
| Guitar Min | C2,G2,C3,Eb3,G3 | Rock chord |
| Vulcan Bell | C3,F#3 | Synthesizer effect |
There are two ways to build a song: the traditional method of entering in each note or by building layers that we call “phrases.” Super Studio Session comes with an entire library of phrases in the Phrase Library. It contains phrases of music that you can insert into songs and it serves also as a library where you can save your own phrases. The following is a tutorial which shows you how to build a song from phrases.
1. Open a new (“Untitled”) file.
2. If necessary, click on the Phrase Library Window to make it active and insert the phrase “Brazilperc#1” by holding down the shift key and clicking on it. See the diagram below. It will appear on the screen where the insertion point is blinking.
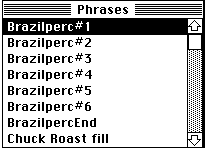
3. Select the entire phrase by placing the cursor in the Range Selection Bar at the beginning of the phrase, holding down the mouse button, and dragging the cursor down and to the right.
4. Choose the “Repeat” command from the “Selection” menu. When the dialog box appears, type in the number “32” and select “OK” (or press the return key). The selected phrase should now have a repeat notation at the beginning and at the end.
5. Using the scroll bar of the Editor Window, scroll to the end of the first track. Click once in the Range Selection Bar at a point after the end of the repeat. Locate “BrazilpercEnd” in the Phrase Library Window and insert it at the end of Track 1 by shift clicking on its name. The three note phrase should appear at the end of the track. This completes the steps for Track 1.
6. Repeat steps 2 through 5 for the remainder of the phrases according to the table on the next page. The only difference is that tracks 2 through 8 have a number of whole rests before the phrase. To add these whole rests, click on the whole note rest in the Note Palette. Move the cursor onto the Editor Window and click to enter the required number of rests at the beginning of each track. This is a great opportunity to try the shift clicking shortcut described earlier.
| Track | Begin | Phrase | Repeat (x times) |
| 1 | 0 rests | Brazilperc#1 | 32X |
| 2 | 2 rests | Brazilperc#2 | 15X |
| 3 | 4 rests | Brazilperc#3 | 14X |
| 4 | 6 rests | Brazilperc#4 | 26X |
| 5 | 8 rests | Brazilperc#5 | 6X |
| 6 | 12 rests | Brazilperc#6 | 5X |
| 7 | 16 rests | Brazilperc#7 | 8X |
| 8 | 24 rests | Brazilperc#8 | 8X |
7. Select the play button to hear your new song (the instrument names are included in the phrases of your song already so there is no need to specify them). If it doesn’t sound correct, check the number of rests and repeats. Also, remember to put "BrazilpercEnd" at the end of each track so the tracks all end with a flourish.
![]() Appendix
IV: Other Instruments
Appendix
IV: Other Instruments
The following additional instruments/songs are available for downloading
![]() Brass:
Trumpets, trombones, and french horns provide arrangements of jazz, pop, and big band.
Includes the following songs: Fanfare, G. Rossini, Kingston Horns.8, Latin Brass, M.
Moussorgsky, Rock Horns, and Svelte Swing.
Brass:
Trumpets, trombones, and french horns provide arrangements of jazz, pop, and big band.
Includes the following songs: Fanfare, G. Rossini, Kingston Horns.8, Latin Brass, M.
Moussorgsky, Rock Horns, and Svelte Swing.
![]() Country:
Banjos, country & steel guitars, fiddles, harmonicas & jaw harps make any
country song. Includes the following songs: MacDuelists, Floyd vs. Floyd, The Cuckoo,
MackyFount’nBreakdown, Turkey in the Mac, Rag Picky, Mules Alfredo, and Home in the
Range.
Country:
Banjos, country & steel guitars, fiddles, harmonicas & jaw harps make any
country song. Includes the following songs: MacDuelists, Floyd vs. Floyd, The Cuckoo,
MackyFount’nBreakdown, Turkey in the Mac, Rag Picky, Mules Alfredo, and Home in the
Range.
![]() Heavy
Metal: Heavy metal guitars, drums, and keyboards give that Aerosmith sound.
Includes the following songs: 80's Shock, Metal Bros., On Stage, Power Fool, 70.5 FM, and
JeThrow.
Heavy
Metal: Heavy metal guitars, drums, and keyboards give that Aerosmith sound.
Includes the following songs: 80's Shock, Metal Bros., On Stage, Power Fool, 70.5 FM, and
JeThrow.
![]() Sound
Effects: 79 digitized samples of animals, machines, everyday sounds, and funny
effects make almost any noise. Includes the following songs: Carpentry, Persian Reggae,
Jogging, Kitchen Jamboree, Swinal Tap.8, Mary Hadda, Hurry Up!, Modern Times, Western,
Jingle Traffic, and Space Worthy.
Sound
Effects: 79 digitized samples of animals, machines, everyday sounds, and funny
effects make almost any noise. Includes the following songs: Carpentry, Persian Reggae,
Jogging, Kitchen Jamboree, Swinal Tap.8, Mary Hadda, Hurry Up!, Modern Times, Western,
Jingle Traffic, and Space Worthy.
![]() String
Quartet: Violins, violas, cellos, basses and songs from Bach, Debussy, Mozart,
Dvorak, and Schubert make anyone sound like a classical composer. Includes the following
songs: Y.Disco, LowScale, PizzScale, ShortScale, ViolinScale, ViolinNames, and Silence.Ex.
String
Quartet: Violins, violas, cellos, basses and songs from Bach, Debussy, Mozart,
Dvorak, and Schubert make anyone sound like a classical composer. Includes the following
songs: Y.Disco, LowScale, PizzScale, ShortScale, ViolinScale, ViolinNames, and Silence.Ex.
![]() Appendix
V: Software License Agreement
Appendix
V: Software License Agreement
1. Grant of License. Bogas Productions (“Licensor”) hereby grants to you (“Licensee”), a non-exclusive, non-transferable license to display and use the computer program currently known as “Super Studio Session” and the related documentation materials (the “Software”). Licensor’s grant to Licensee is subject to the terms and conditions of this Software License Agreement (the “License”). Licensor reserves all rights not expressly granted by this License.
2. Use or Transfer. This License is personal to the Licensee. Licensee may use and copy the Software only as expressly authorized herein. Licensee may not, without the express written consent of Licensor: (a) network or use the Software on more than a single computer at the same time, (b) distribute any copies of the Software to any third party, (c) modify the Software in any way or prepare any derivative works of the Software, or (d) grant any sublicense of or concerning the Software to any third party.
3. Copy Restrictions. The Software is copyrighted. Unauthorized copying or distribution of the Software is expressly forbidden. Licensee represents and warrants that it will not remove, delete, or in any way alter or modify Licensor’s copyright notice contained in the Software. Subject to the terms of this License, Licensee may make one (1) copy of the Software for archival purposes.
4. DISCLAIMER OF WARRANTIES. THE SOFTWARE IS PROVIDED “AS IS” WITHOUT WARRANTY OF ANY KIND. LICENSOR MAKES AND LICENSEE RECEIVES NO WARRANTIES, WHETHER EXPRESSED OR IMPLIED. ALL IMPLIED WARRANTIES OF MERCHANTABILITY AND FITNESS FOR A PARTICULAR PURPOSE ARE EXPRESSLY EXCLUDED. LICENSOR DOES NOT WARRANT THAT THE FUNCTIONS CONTAINED IN THE SOFTWARE SHALL MEET LICENSEE’S REQUIREMENTS OR THAT THE OPERATION OF THE SOFTWARE SHALL BE UNINTERRUPTED OR ERROR FREE.
5. LIMITATION OF LIABILITY. IN NO EVENT SHALL LICENSOR OR ANYONE ELSE WHO HAS BEEN INVOLVED IN THE CREATION, PRODUCTION, OR DISTRIBUTION OF THE SOFTWARE BE LIABLE TO LICENSEE OR ANY OTHER PERSON OR ENTITY FOR ANY DAMAGES, LOST PROFITS, LOST SAVINGS, LOST DATA, OR ANY OTHER INCIDENTAL, CONSEQUENTIAL, SPECIAL, OR PUNITIVE DAMAGES, ARISING OUT OF THE PURCHASE, USE, INABILITY TO USE, OR OPERATION OF THE SOFTWARE, WHETHER IN CONTRACT OR TORT, EVEN IF LICENSOR HAS BEEN ADVISED OF THE POSSIBILITY OF SUCH DAMAGES. SOME STATES DO NOT ALLOW THE LIMITATION OF LIABILITY FOR CONSEQUENTIAL DAMAGES. LICENSOR’S LIABILITY, IN ALL INSTANCES, SHALL BE LIMITED TO THE PURCHASE PRICE OF THE SOFTWARE.
6. Miscellaneous. This License shall be governed by and enforced in accordance with the laws of the State of California. If any provision of this License is determined to be illegal or unenforceable, all other provisions shall remain in full force and effect. This License is the complete and exclusive expression of the understanding between Licensor and Licensee. It supersedes any and all prior and contemporaneous, oral and written, communications relating to the subject matter of this License. This License may not be modified or amended except by a written document signed by both Licensor and Licensee.
A
About Studio Session
Activity Meter
Add Instruments
Apple Menu
Audition Instrument
C
Change
Change All Tracks
Change Phrase Library
Change Repeat
Change, Then Find
Change Phrase Library
Clear
Configure Menu
Copy
Create Phrase Library
Customize Option Names
Cut
E
Edit Menu
Edit Track
Edit Phrase Info
Eraser Tool
F
Find/Change
Find Next
File Menu
I
Insertion Menu
Insertion Bar
Insert Ending
Insert Instruments
Insert Key Signature
Insert Measure Bars
Insert a Note
Insert a Series of Notes
Insert a Phrase
Insert a Rest
Insert Tempo Change
Insert Time Signatures
Insert Volume
Installation
Insert Instrument
J
JukeBox
M
MIDI Menu
Modify Duration
Modulation
N
New Song
Note Length
Note Tool
P
Pan
Paste
Pedal On/Pedal Off
Phrases
Playing An Existing Song
Print
Q
Quit
R
Range Selection Bar
Record To Disk
Repeat
Replacing a Note
Revert
S
Save Song
Save
Save As
Save As a Phrase
Set Display Options
Show Instruments
Show Notes
Show Phrase Library
Sound Manager
Start JukeBox
Swing
T
Tempo Meter
Tie
Track On/Off Buttons
Track Number
Transpose Down Half Step
Transpose Down Octave
Transpose Up Half Step
Transpose Up Octave
U
Undo
W
Windows Menu
Writing a New Song
DETAILS
Super Studio Session™ © 1991 Bogas Productions.
This manual © 1992 Bogas Productions. All rights
reserved.
Software written by Steve Capps, with Neil Cormia and Ty Roberts.
Revisions written by Steve Capps.
Songs written by Ed Bogas.
Artwork designed by Marge Boots.
Manual written by Marie D’Amico.
Special thanks to Jaye and Lew.
This manual was written using Microsoft® Word 4.0.
Apple®, the Apple logo®, HyperCard and Macintosh® are trademarks and/or registered trademarks of Apple Computer, Inc. Microsoft® is a registered trademark of Microsoft Corporation. SoundEdit™ is a trademark and MacRecorder® is a registered trademark of Macromedia. Super Studio Session™, SSMU™, and Jam Session™ are trademarks of Bogas Productions.
If you have any questions, please email us.